Roadrunna
Full Member
 Pissin off the purists
Posts: 183
|
Post by Roadrunna on Aug 15, 2008 2:56:30 GMT -5
Paul,
I don't know what the individual price for the rack is but it's an extra $75 on top of the kit price to have a RHD rack and to shorten it. I've given them the frame measurements (which are stndard to the drawings) so i'm presuming they are going to shorten the control arms to the width I need. I went for the base ford pattern 11" rotors, can always change them later if needed.
James,
Good to hear it's easily workable for when I no doubt change my mind later on lol ;D
|
|
|
|
Post by 1973v8bug on Aug 15, 2008 7:44:49 GMT -5
Looks like the project is coming along pretty good. to the guy above me who wrote about the mustang 2 rack wondering if it will fit or not. I used a Mustang II Rack on my VW and I narrowed it 8 Inches all together so just in case you cant get it to fit, atleast you know that the rack does come apart and it can be shortened if needed. I had to cut 8 inches out of the housing of rack shorten it up weld it back together and for the inside shaft I cut 6 1/2 inches out of it and took 3/4 inch off each tie rod end to equal up the 8 inches. I was unsure if a mustang II rack could be shortened so I got the bright idea to tear it apart and see for myself and sure enough I did it. My car stears great with it. I Have see articles about shortening the rack but from what I have seen it requires a Lathe and a way to re-thread it where the inner tie rod connects....Maybe I should check with my local machine shop about shortening just the rack.....I can shorten the housing myself. |
|
|
|
Post by badnblown69vw on Aug 15, 2008 9:57:03 GMT -5
Nah, You dont need a Nathe nor do you need to re thread the housing although I guess you could do it that away. What I did was I cut about 6 1/2 inches out of the shaft about 2" in from the end on the drivers side of the rack and then I grind the 2 ends down to a point like a pencil and then I just keep on welding and turning welding and turning making sure the rod stays straight. Allotta people dont like the idea of cuting something down and rewelding like I did but there is no Way that it is going to break. I have done the same thing to my 9" ford Axles a couple of times for different projects, I measure for the axles, cut them down, grind them to a point, clamp both ends in a piece of angle and weld them back up while turning it. I have never had any problems with them and ive ran them in 600 HP cars, so if that axle aint gonna break then that steering shaft inside that rack aint gonna break cause there really aint a whole lot of pressure on it to begin with.
|
|
|
|
Post by Mock1racer on Aug 15, 2008 10:01:41 GMT -5
hey bad blown,
do you use a stick or mig for that application? If I can save some $ on my axle build I could do it the way u did and save on machine expences , If mig are u using hard wire or flux core? if stick r u using a 7018 or 7024? that would help me a lot!!
|
|
|
|
Post by badnblown69vw on Aug 15, 2008 23:00:05 GMT -5
I have a Hobart Handler 180 Mig Welder and I use .030 Wire, I turn the Heat up on 3 and weld the axles till there glowing orange and then I know that there going together good. If you do it correctly you will not have any problems. When I first got my vw going this is what I did and I just recently took out the cut down and welded together axles and installed a set of Strange Axles. Not that I didnt trust my Axles but I just felt better with good axles in the car. I would run the axles until you had the funds to buy a good set of axles. My VW is making Approx. 550 HP on the tune up im running right now and I reemed on it pretty hard and didnt have no problem out of the axles so you should be good. Just remember to Cut the axles down, Grind both ends to a Point like a Pencil and then clamp them into a piece of Angle making sure there straight, tack weld them and turn tack and turn and then just keep on welding and turning until you fill up the gap and then smooth em up when your done. Good Luck with the build.
|
|
|
|
Post by Mock1racer on Aug 18, 2008 6:03:20 GMT -5
Sweet!! thanx for the info.
|
|
|
|
Post by V8 Super Beetle on Aug 18, 2008 9:29:35 GMT -5
Awesome! Good info.
|
|
|
|
Post by 1973v8bug on Jan 16, 2009 20:44:06 GMT -5
Haven't had enough time or money to get much more done, and on top of this project I picked up an 80 toyota rock crawler project I am finishing......not enough time to finish two frame up projects...lol here are a few more pics. 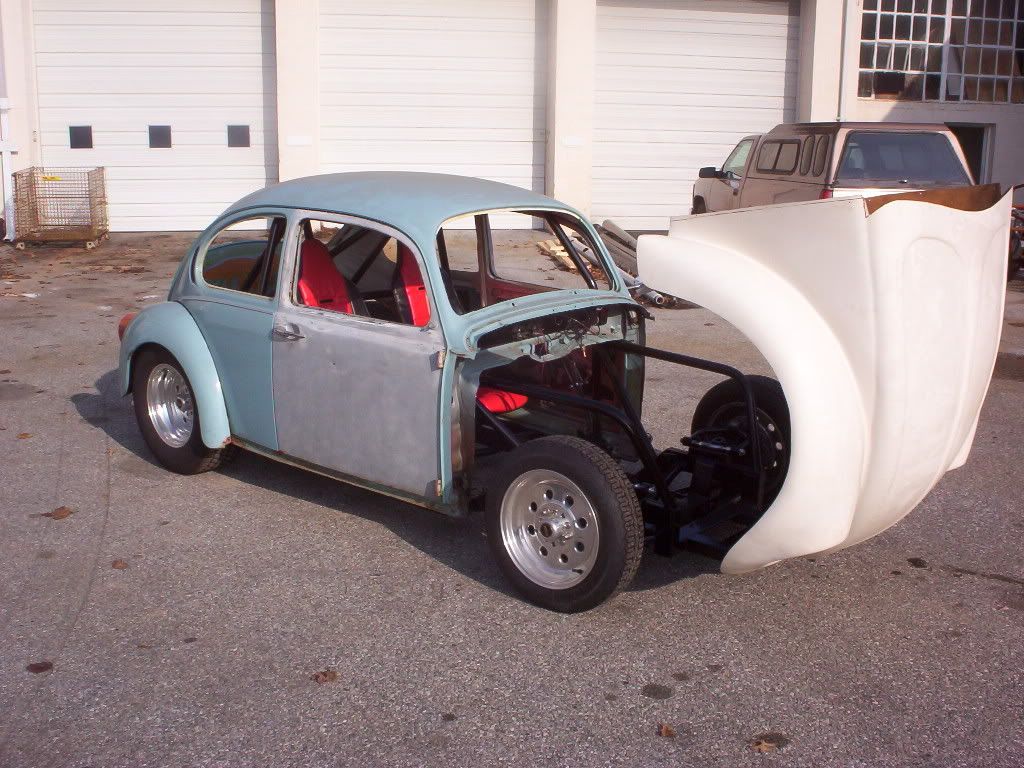 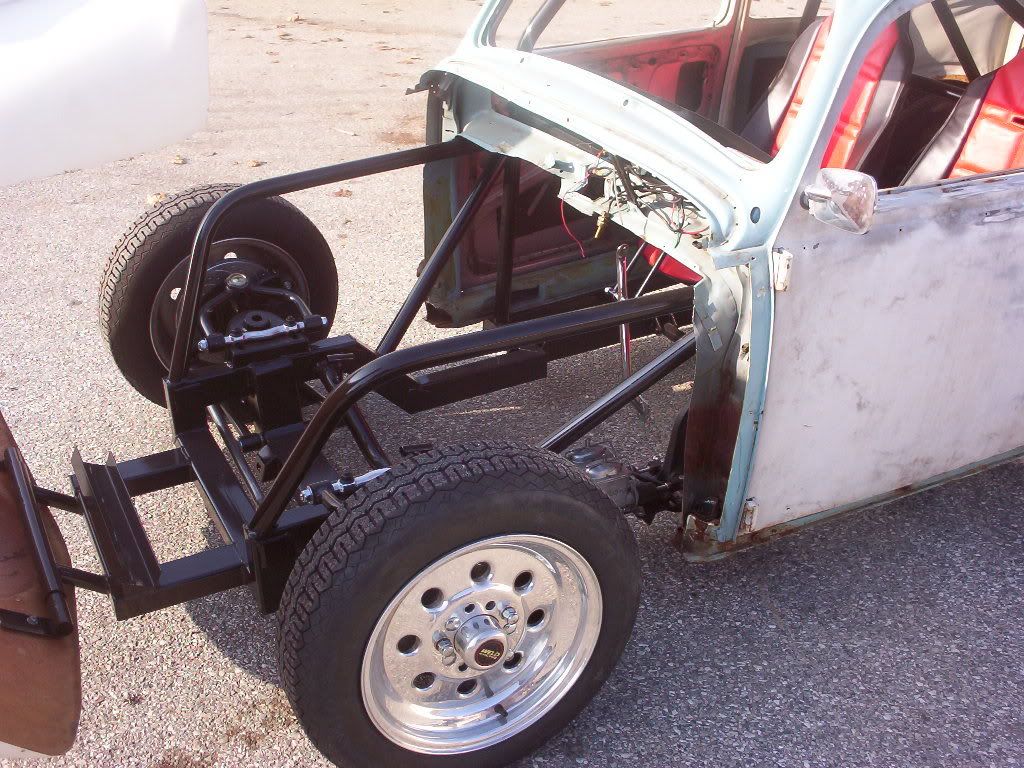 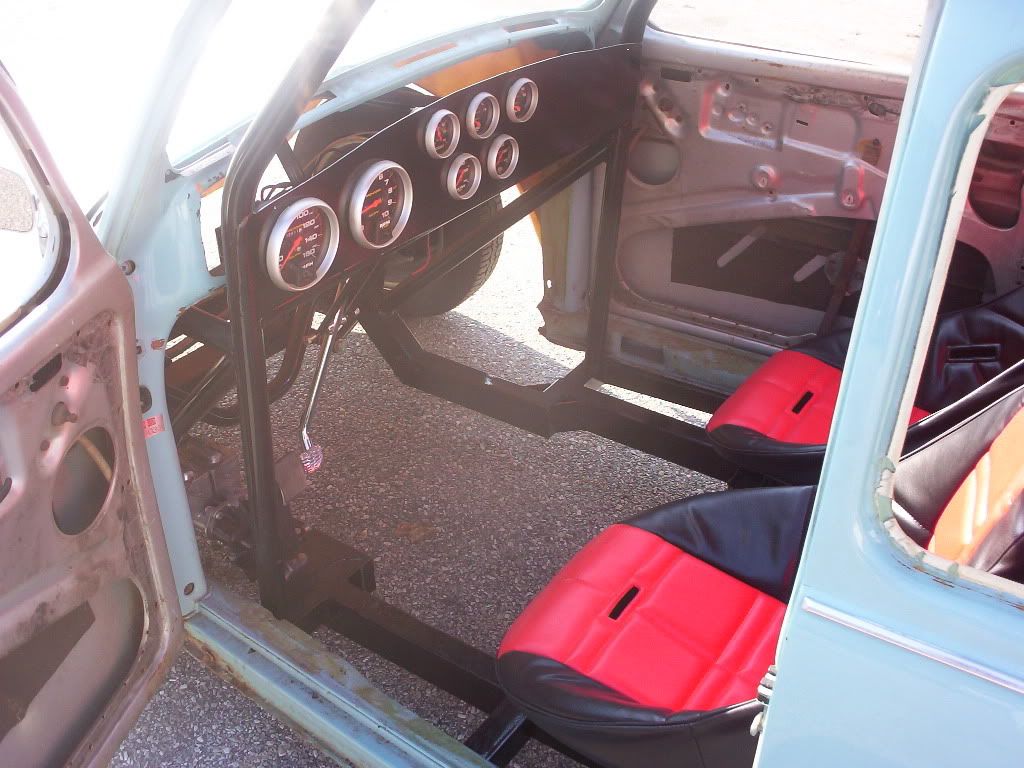 |
|
Roadrunna
Full Member
Pissin off the purists
Posts: 183
|
Post by Roadrunna on Jan 16, 2009 20:48:45 GMT -5
Will you be welding the body in to the frame at some point or are you going to try and keep it removable ? Looking good though ;D Had my frame out on the drive next to the bug earlier today.   |
|
|
|
Post by 1973v8bug on Jan 16, 2009 21:21:03 GMT -5
it is bolted on using the stock body mount holes in the heater channels right now but I will be adding more attachment points later when the firewall and floorpans are done
|
|
|
|
Post by V8 Super Beetle on Jan 19, 2009 14:47:07 GMT -5
Wow, that's looking good!
|
|
|
|
Post by Carmen Dottoli on Jan 31, 2009 12:23:26 GMT -5
This project is beyond badass man!! It really is, the tilt front, the dash..etc. Totally awesome build!!!
|
|
|
|
Post by darrinoddiebear on Feb 12, 2009 5:56:07 GMT -5
try prostreetbug@cox.net instead of prostreetbug.com
|
|
|
|
Post by joedirt on Jul 22, 2009 12:30:45 GMT -5
Will you be welding the body in to the frame at some point or are you going to try and keep it removable ? Looking good though ;D Had my frame out on the drive next to the bug earlier today. What does your rear frame section measure between the tires  |
|
Roadrunna
Full Member
Pissin off the purists
Posts: 183
|
Post by Roadrunna on Jul 22, 2009 14:01:50 GMT -5
23" inside to inside & 27" for the outer faces.
|
|